
Installing a bulkhead fitting may look intimidating at first, especially if you’ve never drilled into a tank, barrel, or container before. However, with the right tools, a little preparation, and a clear understanding of how bulkhead fittings work, this is a project almost anyone can complete successfully. A properly installed bulkhead fitting creates a strong, watertight connection that can last for years without leaks.
In this step-by-step guide, you’ll learn exactly how to install a bulkhead fitting the right way. We’ll cover everything from choosing the correct fitting and tools to drilling the hole, installing the gasket, tightening the nut, and testing for leaks. Whether you’re working on a water tank, aquarium, rain barrel, or DIY plumbing project, this guide will walk you through the process from start to finish.
What Is a Bulkhead Fitting?
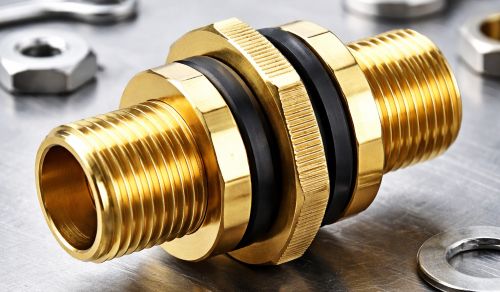
A bulkhead fitting is a specialized connector designed to pass through the wall of a container while maintaining a watertight seal. It allows liquid (or sometimes gas) to flow from inside a tank or vessel to an external pipe, hose, or fitting without leaking.
Most bulkhead fittings consist of three main parts:
1. The fitting body, which passes through the hole
2. A rubber or silicone gasket, which creates the seal
3.. A locking nut, which tightens the fitting against the container wall
Bulkhead fittings are commonly used in:
1. Water storage tanks
2. Aquariums and fish tanks
3. Rain barrels
4. Brewing systems
5. Chemical containers
6. Industrial fluid handling systems
They are available in various materials, including plastic (PVC, polypropylene), brass, and stainless steel, making them suitable for a wide range of applications.
Why Proper Installation Matters
A bulkhead fitting is only as good as its installation. Even a high-quality fitting can leak if it’s installed incorrectly. Common problems like slow drips, cracked containers, or warped gaskets usually come from mistakes made during drilling, gasket placement, or tightening.
Proper installation ensures:
➡️ A long-lasting, leak-free seal
➡️ Structural integrity of the tank or container
➡️ Safe and reliable fluid flow
➡️ Reduced maintenance and repairs
Taking the time to install the fitting correctly from the start will save you frustration and cleanup later.
Tools and Materials You’ll Need
Before you begin, gather all tools and materials so the installation goes smoothly.
Required Tools
1. Drill (corded or cordless)
2. Hole saw or step bit (correct size for your bulkhead fitting)
3. Measuring tape or ruler
4. Marker or pencil
5. Adjustable wrench or pliers
6. Deburring tool, file, or sandpaper
Materials
1. Bulkhead fitting (correct size and material)
2. Rubber or silicone gasket (usually included)
3. Thread seal tape (for threaded connections)
Optional
➡️ Silicone sealant (only in specific situations)
➡️ Safety glasses and gloves
Having everything ready before you start reduces the chance of errors or rushed decisions.
Choosing the Right Bulkhead Fitting
Selecting the correct bulkhead fitting is just as important as installing it properly.
Size
Bulkhead fittings are sized based on the internal diameter of the fitting, not the hole size. Always check the manufacturer’s recommended hole diameter and match it to your hole saw.
Material
1. Plastic (PVC or polypropylene): Ideal for water, aquariums, and most DIY projects
2. Brass: Good for plumbing but may corrode in certain environments
3. Stainless steel: Best for high pressure, chemicals, or food-grade systems
Thread Type
1. Threaded bulkheads connect to pipes or fittings using threads
2. Slip bulkheads require glued connections
Make sure the bulkhead material is compatible with the liquid you’ll be handling.
Preparing for Installation
Preparation is key to a clean and leak-free installation.
Step 1: Empty and Clean the Container
Drain all liquid from the tank or container and wipe down the area where the bulkhead will be installed. Dirt, residue, or moisture can interfere with gasket sealing.
Step 2: Choose the Location Carefully
Select a flat area with enough clearance on both sides for the fitting, gasket, nut, and plumbing. Avoid curved or uneven surfaces whenever possible.
Step 3: Measure and Mark
Use a measuring tape and marker to mark the center point of the hole. Double-check your measurements before drilling, mistakes here are difficult to fix.
Step-by-Step Bulkhead Fitting Installation
Step 1: Drill the Hole
Attach the correct-size hole saw or step bit to your drill. Drill slowly and steadily at the marked location. Applying too much pressure can crack plastic containers or warp thin metal.
Tips:
➡️ For plastic, use a low drill speed
➡️ For metal, use cutting oil and steady pressure
➡️ Keep the drill perpendicular to the surface
Once the hole is cut, remove any loose debris.
Step 2: Clean and Smooth the Hole
After drilling, the edges of the hole may be rough or sharp. Use sandpaper, a file, or a deburring tool to smooth the edges.
This step is crucial because:
➡️ Sharp edges can damage the gasket
➡️ Uneven surfaces prevent proper sealing
➡️ Wipe away any dust or shavings once finished.
Step 3: Insert the Bulkhead Fitting
Insert the bulkhead fitting through the hole from the inside of the container in most applications. The gasket should be placed on the inside, between the fitting flange and the container wall.
This positioning allows water pressure to push the gasket tighter against the wall, improving the seal.
Make sure:
➡️ The gasket lies flat
➡️ The fitting sits flush against the surface
➡️ No debris is trapped under the gasket
Step 4: Tighten the Locking Nut
Thread the locking nut onto the fitting from the outside of the container.
Start by tightening it by hand. Once snug, use a wrench or pliers to tighten it slightly more. Do not overtighten.
A good rule of thumb is:
➡️ Hand-tight plus one-quarter to one-half turn
Overtightening can:
➡️ Deform the gasket
➡️ Crack plastic fittings
➡️ Warp thin container walls
Step 5: Attach Plumbing or Piping
Once the bulkhead fitting is secure, attach your pipe, hose, or valve.
For threaded connections:
➡️ Wrap thread seal tape clockwise around the threads
➡️ Tighten until snug, but avoid excessive force
For slip connections:
➡️ Use appropriate PVC cement or adhesive
➡️ Allow proper curing time before testing
Ensure everything is aligned properly to avoid stress on the fitting.
Testing for Leaks
Testing is a critical final step.
How to Test
1. Slowly fill the container with water
2. Watch the bulkhead fitting closely
3. Check both the gasket area and threaded connections
If You See a Leak
1. Slight drip: tighten the nut slightly
2. Persistent leak: drain the container and recheck gasket placement
3. Severe leak: remove the fitting and inspect for cracks or debris
4. Never ignore even a small leak, it will usually get worse over time.
Common Mistakes to Avoid
Avoiding these common errors can save you time and frustration:
1. Installing the gasket on the wrong side
2. Drilling the wrong hole size
3. Overtightening the locking nut
4. Using silicone sealant unnecessarily
5. Installing on a curved or uneven surface
6. Skipping the leak test
Bulkhead fittings are designed to seal mechanically with a gasket—extra sealants often cause more harm than good.
Maintenance and Long-Term Care
Bulkhead fittings require minimal maintenance, but occasional checks help ensure long-term reliability.
Maintenance Tips
➡️ Inspect fittings periodically for leaks
➡️ Check for cracks or material degradation
➡️ Retighten slightly if needed
➡️ Replace gaskets if they become brittle or damaged
With proper care, a quality bulkhead fitting can last many years.
Frequently Asked Questions
1. Do I need silicone sealant?
In most cases, no. Bulkhead fittings are designed to seal with a gasket alone. Silicone may be used on rough or uneven surfaces, but it’s usually unnecessary.
2. Can bulkhead fittings be installed on curved surfaces?
They work best on flat surfaces. Curved surfaces increase the risk of leaks unless special gaskets or adapters are used.
3. How tight should a bulkhead fitting be?
Hand-tight plus a small additional turn with a wrench is usually sufficient.
4. Can I reuse a bulkhead fitting?
Yes, but always inspect and replace the gasket if it shows signs of wear.
Conclusion
Installing a bulkhead fitting step by step is a straightforward process when done correctly. By choosing the right fitting, preparing the surface, drilling carefully, positioning the gasket properly, and tightening the nut just enough, you can create a reliable, watertight connection that lasts for years.
Whether you’re working on a DIY rain barrel, an aquarium setup, or a large water tank, following these steps will help you avoid leaks, cracks, and unnecessary repairs. Take your time, test thoroughly, and enjoy the satisfaction of a job done right.
If you’re ready to start your next project, a properly installed bulkhead fitting is a solid foundation you can trust.
Post time: Feb-06-2026