
If you’ve ever worked on a brake system, fuel line, or turbo oil feed, chances are you’ve come across a banjo bolt. This small but essential fastener plays a huge role in sealing fluid systems safely and effectively.
Installing a banjo bolt correctly isn’t just about tightening a bolt—it’s about ensuring system performance, preventing dangerous leaks, and keeping your vehicle safe on the road. In this guide, we’ll walk you through everything you need to know: what a banjo bolt is, the tools you’ll need, safety tips, and a clear step-by-step installation process.
What Is a Banjo Bolt?
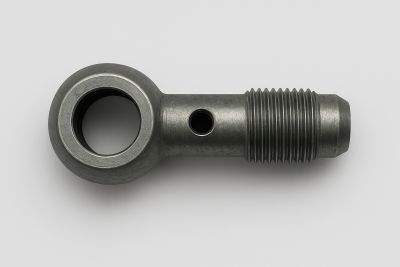
A banjo bolt is a hollow bolt designed to pass fluid through its center and out of small side holes. It’s paired with a banjo fitting, which looks like a ring or eyelet, and sealed on both sides with crush washers (usually copper or aluminum).
When tightened, the banjo bolt secures the fitting against a flat surface, allowing fluid to flow through the bolt while maintaining a tight, leak-free seal.
Common applications include:
➡️ Brake systems – connecting brake lines to calipers or master cylinders
➡️ Fuel lines – delivering pressurized fuel to injectors or rails
➡️ Turbo oil feeds – ensuring proper lubrication and cooling of turbochargers
If you’re adding diagrams or photos later, a cutaway illustration of a banjo bolt assembly is very helpful for visual learners.
Tools and Materials You’ll Need
Before starting, gather the following:
Essential tools:
➡️ Open-end or box wrenches (correct size for your banjo bolt)
➡️ Torque wrench (for precise tightening)
➡️ Ratchet set (if space is tight)
Parts required:
➡️ Banjo bolt (new or inspected for damage)
➡️ Banjo fitting (correct for your system)
➡️ New crush washers (always replace old ones)
Safety gear:
➡️ Mechanic gloves
➡️ Safety glasses
➡️ Shop towels or rags
Safety Precautions
Working with fluid systems requires care. Keep these safety practices in mind:
1. Always work in a well-ventilated area—especially with fuel systems.
2. If working under a car, use jack stands for safety—never rely on a jack alone.
3. Handle brake fluid and fuel carefully; both can damage paint and skin.
4. Dispose of old washers, rags, and fluids properly and responsibly.
Step-by-Step Installation Guide
Step 1: Prepare the Area
Clean the connection point thoroughly. Remove dirt, grease, or residue from old washers. A clean surface ensures a proper seal.
Step 2: Position the Banjo Fitting
Slide a new crush washer onto the bolt, place the banjo fitting in position, and then add another washer on the opposite side. Think of it as a “washer–fitting–washer” sandwich.
Step 3: Insert the Banjo Bolt
Thread the bolt into the port by hand. This helps avoid cross-threading, which can ruin the threads and compromise sealing.
Step 4: Tighten the Bolt
First, snug the bolt gently with a wrench. Then, use a torque wrench to tighten it to the manufacturer’s specified torque value. Over- or under-tightening can both cause leaks.
Step 5: Check Alignment
Ensure the banjo fitting is not twisted or angled incorrectly—it should sit flush and aligned with the port.
Step 6: Inspect for Leaks
Once installed, pressurize the system:
➡️ For brakes: press the pedal.
➡️ For fuel: prime the fuel pump.
➡️ For turbo oil feeds: start the engine briefly.
➡️ Check around the bolt for any signs of seepage or leaks.
Common Mistakes to Avoid
1. Reusing old crush washers – they deform once and won’t seal properly again.
2. Over-tightening or under-tightening – both can lead to leaks or stripped threads.
3. Not cleaning the connection area – dirt or residue prevents proper sealing.
4. Cross-threading the banjo bolt – always start threading by hand.
Troubleshooting Tips
1. If the bolt keeps leaking: Replace the crush washers first. If the problem persists, inspect the bolt and fitting for damage.
2. Faulty washers: A washer that’s uneven, scratched, or reused will fail to seal.
3. Damaged threads: Check both the banjo bolt and the receiving port. Stripped threads may require re-tapping or replacement.
4. When to replace: If the bolt itself is cracked, corroded, or stripped, replace it entirely rather than reusing it.
FAQs
Does a banjo bolt have to line up?
No. The holes inside the bolt allow fluid to flow regardless of bolt orientation, as long as it’s tightened correctly.
How does a banjo bolt work?
It channels fluid through its hollow center and side ports, sealed in place with crush washers and a banjo fitting.
How tight do you tighten a banjo bolt?
Always follow the manufacturer’s torque specs—over-tightening can crush washers unevenly or strip threads.
How to stop a banjo bolt from leaking?
Replace washers, clean the surfaces, and ensure proper torque. If it still leaks, inspect the fitting and bolt for wear or damage.
Conclusion
Installing a banjo bolt may seem straightforward, but it requires attention to detail. Using new crush washers, following torque specifications, and working with a clean connection surface are the keys to preventing leaks and ensuring reliable system performance.
If you’re ever unsure, consult a professional mechanic—fluid system safety isn’t something to take lightly. With the right approach, you’ll have a properly sealed banjo bolt that will perform as intended for years to come.
Post time: Sep-17-2025